How to resize print area and fit to one page in Excel?
When printing an Excel worksheet, it’s common to find that your content spills over onto multiple pages, causing extra columns or rows to be printed on second or subsequent pages. This not only leads to unnecessary use of paper but can also make your reports less clear and harder to read. Ideally, you want all your essential data presented clearly on a single page. So, is there an effective way to resize the print area and ensure that everything fits neatly onto one page in Excel? Fortunately, there are several practical and easy-to-apply methods in Excel that can help you achieve this. In this article, we will explore various solutions for resizing the print area and fitting your content onto one page, ensuring both professional appearance and efficient printing.
➤ Resize area and fit to one page with Fit Sheet to One Page feature
➤ Resize area and fit to one page by changing the Width and Height
➤ Print multiple selections and fit to one page in Excel with Kutools for Excel
➤ VBA Code – Automatically set the print area and scale worksheet to fit on one page
➤ Excel Formula – Dynamically define the print area for auto-adjusting print range
Resize area and fit to one page with Fit Sheet to One Page feature
Excel provides a convenient printing option called Fit Sheet to One Page, which automatically scales your entire worksheet to fit onto a single page when printing. This feature is available in Excel 2010, 2013, 2016, and later versions—but not in Excel 2007.
By using this feature, you can keep your printouts tidy and avoid page breaks or half-empty print pages. However, if your dataset is large, the content may be scaled down significantly, making it harder to read. Always preview the result before printing.
To use this feature:
- Click the File tab and select Print.
- In the Settings section, click the drop-down under No Scaling and choose Fit Sheet to One Page.See the screenshot below:
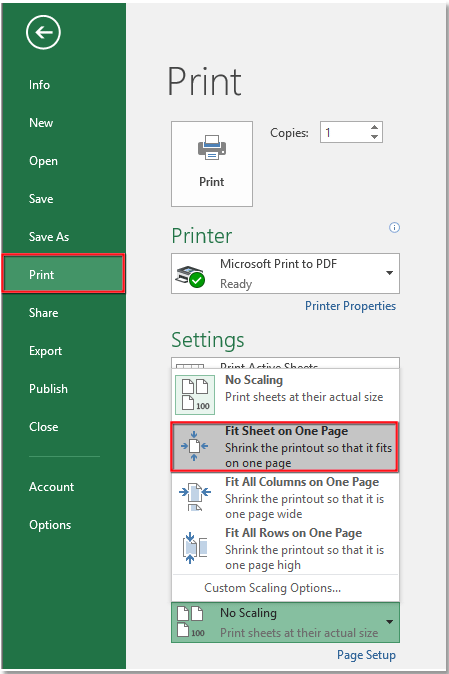
This will automatically resize your worksheet so all data fits on a single printed page. After selecting this option, check the preview pane. If the content appears too small, consider adjusting column widths, removing unneeded rows/columns, or switching to landscape orientation before printing.
Resize area and fit to one page by changing the Width and Height
Another practical way to ensure your entire worksheet prints on a single page is by manually adjusting the Scale to Fit settings. This method gives you more precise control over how Excel scales your data and is available in Excel 2007 and later versions.
By setting both the Width and Height options to 1 page, Excel will compress the entire print area to fit within a single printed page. This is especially helpful when preparing standard reports or presentation-ready documents.
To apply this method:
- Go to the Page Layout tab.
- In the Scale to Fit group, set both Width and Height to 1 page from the dropdown menus.

Once both values are set to 1 page, Excel will automatically scale the worksheet so that the entire content fits on one printed page.
Print multiple selections and fit to one page in Excel with Kutools for Excel
If your worksheet contains important data separated into multiple ranges, you may want to print several selected areas together on a single page for better presentation. This cannot be done with Excel’s native Print Area feature, as it only supports continuous ranges. Kutools for Excel resolves this limitation by offering the Print Multiple Selection Wizard, which allows you to combine multiple ranges and print them on one page — saving paper and improving clarity. This is especially useful for summary reports or data scattered across a sheet.
After free installing Kutools for Excel, follow these steps:
1. Click Kutools Plus > Printing > Print Multiple Selection Wizard.

2. In the wizard dialog, click Add to insert each range you want to include on the page.

3. Click Next. On step 2 of the wizard, tick Specify new print settings, then click Page Setup. Under the Page tab, ensure Fit to is selected, and enter 1 into both width and height boxes.


4. Click OK, then Next. In the final wizard step, choose your desired action — for example, Activate the worksheet, but don't print it to preview before printing.

5. A new worksheet will be generated where all selected ranges are arranged in one print-friendly layout. Now when you print this sheet, all chosen areas will appear on a single page.

- You can rearrange or modify the combined ranges in the new sheet before printing.
- Always use Print Preview to confirm the output before sending it to a printer.
- This method offers much greater flexibility than Excel's built-in print options, especially for non-contiguous data ranges.
VBA Code – Automatically set the print area and scale worksheet to fit on one page
If you regularly need to print dynamic ranges and want to ensure the content always fits onto a single printed page, a simple VBA macro can streamline the process. This is especially useful for automated reporting or shared templates in organizations. Before using VBA, please save your workbook first—macros will modify print settings and cannot be undone with Ctrl + Z.
1. Open the VBA editor: go to the Developer tab > Visual Basic. In the VBA editor, click Insert > Module, then paste the following code:
Sub SetPrintAreaAndScaleToFitOnePage()
    Dim WorkRng As Range
    On Error Resume Next
    xTitleId = "KutoolsforExcel"  ' Dialog title
    Set WorkRng = Application.Selection
    Set WorkRng = Application.InputBox("Please select the range to print:", xTitleId, WorkRng.Address, Type:=8)
    If WorkRng Is Nothing Then Exit Sub
    With ActiveSheet
        .PageSetup.PrintArea = WorkRng.Address
        .PageSetup.Zoom = False
        .PageSetup.FitToPagesTall = 1
        .PageSetup.FitToPagesWide = 1
    End With
    MsgBox "Print area set and scaled to fit on one printed page.", vbInformation, xTitleId
End Sub
2. Press the ![]() Run button or hit F5 to execute the code. A dialog box will prompt you to select the range you want to print. Once selected, Excel will automatically define the print area and scale it to fit on one page.
Run button or hit F5 to execute the code. A dialog box will prompt you to select the range you want to print. Once selected, Excel will automatically define the print area and scale it to fit on one page.
- This macro replaces any existing print area settings on the current worksheet.
- To repeat with a different range, simply rerun the macro.
- For large data selections, scaling may reduce readability—always check Print Preview before printing.
- Macros must be enabled to run this code. If your organization restricts macros, consult IT before proceeding.
Excel Formula – Dynamically define the print area using a named range
If you frequently add or remove rows and want the print area to automatically expand or shrink with your dataset, you can define a dynamic named range using Excel functions such as OFFSET and COUNTA. This approach is ideal for worksheets that are regularly updated—such as reports, logs, or forms—and eliminates the need to manually reset the print area each time the data changes.
1. Go to Formulas > Name Manager > New to create a new named range. In the New Name dialog box, set the Name as PrintArea, and enter the following formula in the Refers to field (assuming your data starts at cell A1):
=OFFSET(Sheet1!$A$1,0,0,COUNTA(Sheet1!$A:$A),COUNTA(Sheet1!$1:$1))2. Click OK to save the named range. Then go to Page Layout > Print Area > Set Print Area. If prompted, type =PrintArea in the formula bar. Your print area will now dynamically adjust as you add or remove data.
Formula breakdown: The OFFSET function defines a range starting from A1, extending downward based on the number of non-blank cells in column A (rows), and rightward based on the number of non-blank cells in row 1 (columns). You can customize the formula to match your actual data starting point.
When choosing between these solutions, consider your worksheet’s size, how often it is updated, and your printing requirements:
- Built-in Excel scaling is fast and effective for small or one-time tasks.
- VBA macros offer automation for repetitive tasks or mass printing setups in enterprise environments.
- Dynamic named ranges are ideal for tables that change in size frequently and need ongoing flexibility.
- Kutools for Excel is recommended when printing across multiple, non-adjacent ranges.
Reminder: If your printed content appears too small or cut off, double-check the paper size, margins, and orientation settings. Always preview the layout with Print Preview before printing. If errors occur with VBA or formulas, verify that your range references match your data layout and adjust the logic as needed. For best results, feel free to combine multiple methods based on your actual workflow or reporting needs.
Best Office Productivity Tools
Supercharge Your Excel Skills with Kutools for Excel, and Experience Efficiency Like Never Before. Kutools for Excel Offers Over 300 Advanced Features to Boost Productivity and Save Time. Click Here to Get The Feature You Need The Most...
Office Tab Brings Tabbed interface to Office, and Make Your Work Much Easier
- Enable tabbed editing and reading in Word, Excel, PowerPoint, Publisher, Access, Visio and Project.
- Open and create multiple documents in new tabs of the same window, rather than in new windows.
- Increases your productivity by 50%, and reduces hundreds of mouse clicks for you every day!
All Kutools add-ins. One installer
Kutools for Office suite bundles add-ins for Excel, Word, Outlook & PowerPoint plus Office Tab Pro, which is ideal for teams working across Office apps.
- All-in-one suite — Excel, Word, Outlook & PowerPoint add-ins + Office Tab Pro
- One installer, one license — set up in minutes (MSI-ready)
- Works better together — streamlined productivity across Office apps
- 30-day full-featured trial — no registration, no credit card
- Best value — save vs buying individual add-in