How to delete string after nth character in Excel?
In Excel, you might often need to manipulate text strings by removing characters after a specific position. For example, you might want to truncate a string after the nth character to standardize data formats or clean up imported text. This task is common when working with identifiers, codes, or any text where only a fixed number of initial characters are required. Deleting content after the nth character helps prevent errors caused by extra data, ensures consistency for data import/export, or facilitates comparison and analysis. This guide will explore three practical techniques for removing characters after the nth character in a string: using formulas, Kutools for Excel, and VBA macros for automation. Each method offers advantages in particular scenarios, and you can select the approach best suited to your needs.
Remove all characters after the nth character with formula
Formulas offer a versatile way to handle text manipulation tasks in Excel, including removing characters after a specific position. This method is useful when you need a dynamic solution that adjusts automatically as your data changes. Here’s how you can use a formula to delete all characters after the nth character in a string:
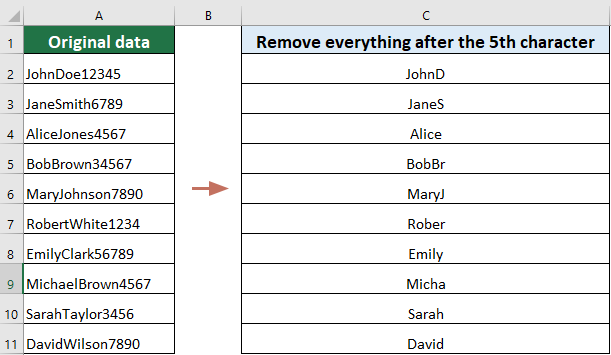
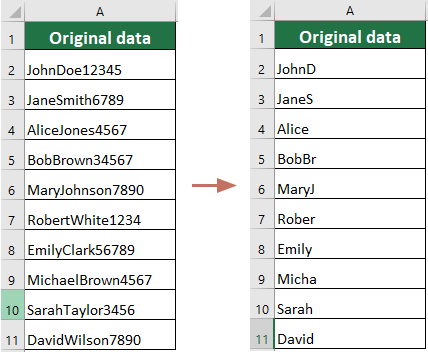
Assuming you want to delete everything after the 5th character from the data in the following screenshot, here's how to handle it:
Select a blank cell and enter the following formula, press the "Enter" key and drag the "Fill Handle" of this result cell down to get the rest of the results.
=LEFT(A2,5)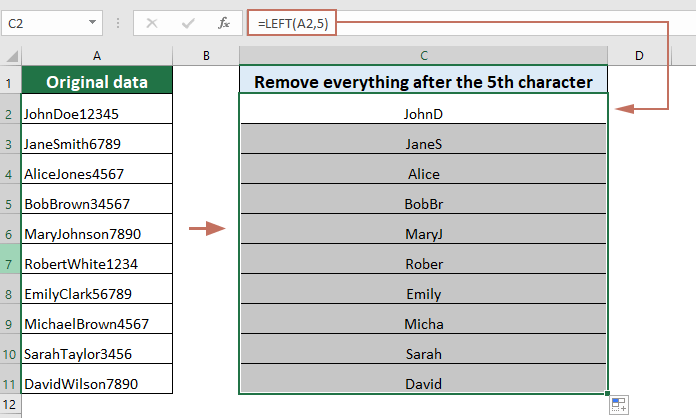
This formula method is best used:
- When you want a quick solution for trimming characters where the number of characters to keep is fixed.
- If your data is stored in a table and you wish to keep the process transparent and reversible.
Common issues and troubleshooting: If your data is shorter than the number you specify (for example, the cell has only 3 characters but you set 5), Excel will simply return the original string without error. However, if your data contains non-text values (formulas returning errors or numbers), ensure they are handled as needed before truncation. For array formulas or more dynamic needs, combine with other text functions (e.g., SEARCH, FIND) for more complex patterns.
Easily remove the specified number of characters after the nth character
"Kutools for Excel" offers a more user-friendly approach for removing characters after a certain position, especially useful when dealing with large datasets or when you prefer a tool-based solution. This method simplifies the task with just a few clicks. Here’s how you can use Kutools for Excel to achieve this:
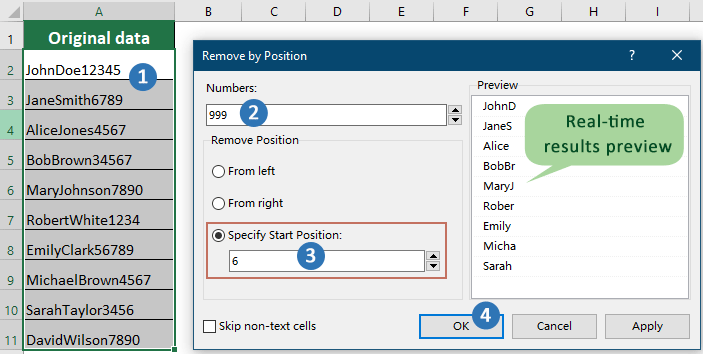
After downloading and installing Kutools for Excel, go to the "Kutools" tab and select "Text" > "Remove by Position" to open the dialog box, then configure as follows:
- In the "Numbers" text box, enter the number of characters you want to remove. Tip: If you want to remove all characters after the nth character, you can enter a very large number, such as 999, to ensure that all characters following the nth character are removed.
- Select the "Specify Start Position" option, then enter the number representing the position from which you want to start removing characters. In this case, to remove characters after the 5th character, enter the number 6. This specifies that character removal will start from the 6th character.
- Click "OK".

Result
Then, the specified number of characters after the 5th character will be removed from each cell in the selected range.
This solution is ideal in scenarios such as cleaning up large volumes of imported data, preparing lists where string length must be standardized, or when users are not familiar with writing Excel formulas or VBA. Kutools for Excel makes batch operations simple and broadens the possibilities for non-technical users.
Key advantages:
- Batch operation on a selected range or the entire worksheet, saving manual effort for large data.
- Intuitive and quick with minimal setup.
- The operation overwrites original data, so it's recommended to back up your worksheet beforehand if you may need the unaltered content later.
- Requires installation of an add-in, which may not be available in some IT-restricted environments.
Kutools for Excel - Supercharge Excel with over 300 essential tools. Enjoy permanently free AI features! Get It Now
VBA Macro – Automatically truncate text after the nth character across a range
When you need to automate the truncation of text after the nth character for multiple cells or large data sets – especially if this task will be performed regularly or in-place – a VBA macro can provide an efficient solution. This method is ideal for users comfortable with macros who require batch processing or want to streamline repetitive text-cleaning operations in Excel.
Typical applicable scenarios include:
- Standardizing reference codes or IDs imported from other systems.
- Automating recurring monthly text-processing tasks for reporting or data cleaning.
- Batch editing where you wish to overwrite the original data instead of storing formula-based results elsewhere.
- Process thousands of entries at once automatically.
- Complete control over which range is affected and how many characters are kept.
- Reusability for recurring tasks by running the macro again as needed.
- Macros alter original data directly, so it's highly advisable to backup your worksheet before running.
- To use the VBA code in the future, save the workbook in a macro-enabled format (.xlsm) and ensure that macros are enabled in Excel settings.
Operation steps:
- In Excel, click Developer > Visual Basic. This opens the Microsoft Visual Basic for Applications editor window.
- In the VBA editor, click Insert > Module. Copy and paste the following code into the new module:
Sub TruncateTextAfterNthCharacter() Dim WorkRng As Range Dim cell As Range Dim n As Integer On Error Resume Next xTitleId = "KutoolsforExcel" Set WorkRng = Application.InputBox("Select the range to truncate:", xTitleId, Selection.Address, Type:=8) If WorkRng Is Nothing Then Exit Sub n = Application.InputBox("Keep how many characters (n)?", xTitleId, 5, Type:=1) If n < 1 Then Exit Sub For Each cell In WorkRng If Not IsEmpty(cell) And VarType(cell.Value) = vbString Then If Len(cell.Value) > n Then cell.Value = Left(cell.Value, n) End If End If Next End Sub - Close the VBA editor. Back in Excel, press Alt + F8, select "TruncateTextAfterNthCharacter", and click Run.
- A dialog will prompt you to select the range to process (e.g., A1:A10), and then to enter the number of characters to keep. After confirming, the macro will overwrite each selected cell with its truncated result.
Precautions and troubleshooting:
- Always back up your data before running a macro. Macros like this one replace original content and cannot be undone with "Undo" (Ctrl+Z) after execution.
- The macro only processes text values. If your range contains numbers, formulas returning numbers, or errors, these will not be changed. Modify the code to address other data types as needed.
- If you see permission prompts about macros, enable macros in your Excel settings (File > Options > Trust Center > Trust Center Settings > Macro Settings).
- To repeat the truncation on other ranges or worksheets, simply rerun the macro. You can assign the macro to a button for frequent reuse.
Best Office Productivity Tools
Supercharge Your Excel Skills with Kutools for Excel, and Experience Efficiency Like Never Before. Kutools for Excel Offers Over 300 Advanced Features to Boost Productivity and Save Time. Click Here to Get The Feature You Need The Most...
Office Tab Brings Tabbed interface to Office, and Make Your Work Much Easier
- Enable tabbed editing and reading in Word, Excel, PowerPoint, Publisher, Access, Visio and Project.
- Open and create multiple documents in new tabs of the same window, rather than in new windows.
- Increases your productivity by 50%, and reduces hundreds of mouse clicks for you every day!
All Kutools add-ins. One installer
Kutools for Office suite bundles add-ins for Excel, Word, Outlook & PowerPoint plus Office Tab Pro, which is ideal for teams working across Office apps.
- All-in-one suite — Excel, Word, Outlook & PowerPoint add-ins + Office Tab Pro
- One installer, one license — set up in minutes (MSI-ready)
- Works better together — streamlined productivity across Office apps
- 30-day full-featured trial — no registration, no credit card
- Best value — save vs buying individual add-in